There are two distinctively different Corvette groups: those who restore these wonderful cars right down to the correct markings on the bolts and those that modify the vintage Corvette. If you are driving a Corvette built from 1963-’67 you must remember, roads and speed limits were vastly different 54 years ago. Hitting the highway and cruising at 75-80 mph for hours was uncommon and most Corvettes simply were not geared for cruising at those speeds. If you checked the automatic transmission box for your C2 Corvette you received the venerable Powerglide, complete with two—yes, count them, two—forward gears. This no doubt influenced most folks to choose the four-speed manual transmission, which by ’60s standards was state-of-the-art.
Of course, it is not 1965 anymore and modern automatic transmissions are sporting 8, even 10, forward gears and the newest Corvette comes standard with a 7-speed manual gearbox. With the advancement in transmission technology it stands to reason that one of the first improvements during the C2 Corvette upgrade process would be the addition of more gears. More gears give you the desired grunt down low and keeps your engine revving in the sweet spot, and with two overdrive gears your engine lives longer and your fuel mileage increases.
Kris Krishna of Ft. Worth, Texas, falls into the modified Corvette group and he likes the idea of modifying (maybe modernizing is a better term) his 1966 Corvette to make it more user friendly in this modern world. While he enjoys the 427-cubic-inch, 450-horsepower engine, the Muncie four-speed hooked to a 3.55 rear gear kept that tach needle a bit too high at cruising speeds. After discussing his choices with Silver Sport Transmissions in Rockford, Tennessee, Kris decided to bring his Corvette to them for a transmission swap.
We also wanted to check out Silver Sport’s latest Corvette offering, the PerfectFit Kit for the 1963-’67 Corvette, so we decided to follow along with the process. This C2 kit enables you to bolt a modern TREMEC T-56 Magnum six-speed behind your existing big- or small-block engine. While there is some major tunnel modifications required, in the end the car has a remarkable “factory-look” with the shifter passing through the modified original shifter plate. One small sacrifice is the loss of the ashtray, but hey, you shouldn’t smoke anyway and even if you do you surely don’t need to smoke in your Corvette! While it is possible to reuse the existing carpet, for a perfect job we recommend installing new carpet over the modified tunnel. According to how the original carpet was installed it may not be long enough for full coverage and since the console trim is raised 1 inch there is generally a noticeable fade line in the carpet, so this is the perfect time to freshen those front carpets. There are minor variations in the installation from year to year as Chevrolet made changes to the parking brake in the C2 Corvette. These variations are addressed in the instructions and the kit fits all 1963-’67 Corvettes.
The kit is well designed and includes all the pieces required to do the mechanical installation. If you have average mechanical skills and reasonable fiberglass skills this swap is well within the reach of the weekend warrior. The mechanical work is just that, a nut and bolt mechanical job, including converting the clutch to hydraulic operation. The fiberglass work is the more difficult part of the swap. One reason we feel confident recommending this kit is the very detailed, 27-page instruction manual included with each kit. This level of instruction takes the guesswork out of the installation.
The process begins by removing a list of things from the interior, including the seats, console side panels, gear shifter and plate and front carpets. After safely jacking the car up and putting it on quality jack stands or ramps, (if you have a lift that makes it even easier) we began with the removal of the original transmission and driveshaft.
After supporting the rear of the engine with a jack the original driveshaft and transmission are unbolted and removed along with the original starter, followed by the bellhousing. The original clutch, pressure plate and throwout bearing assembly will not be reused. Now is the time to carefully examine the flywheel, it is generally good practice to replace or resurface the flywheel before mating it with a new clutch disc. The pilot bushing is removed from the flywheel at this time. Since we will be making fiberglass repairs on the underside of the tunnel it was treated to a very thorough cleaning and degreasing. With all the original equipment removed from the car we can get started on upgrading the driveline.
Rather than resurface the old flywheel Kris went with the new flywheel option, which includes a new roller pilot bearing. The flywheel bolts were treated to a drop of thread locker and torqued to proper specs. The pilot bearing was tapped in place using a socket as the drive tool.
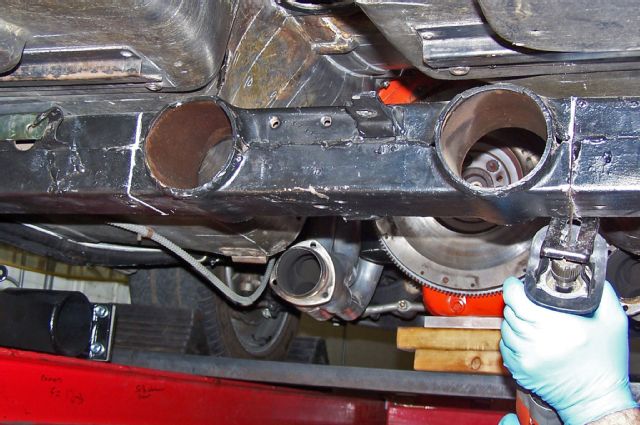
While we were under the car 16-1/2 inches was removed from the center of the transmission crossmember. After carefully scribing the lines the crossmember was removed using a Sawzall, taking special care not to cut into the floor above the crossmember. Completely deburr the ends of the freshly cut crossmember. The piece removed from the crossmember will be replaced with a new bolt-in section.
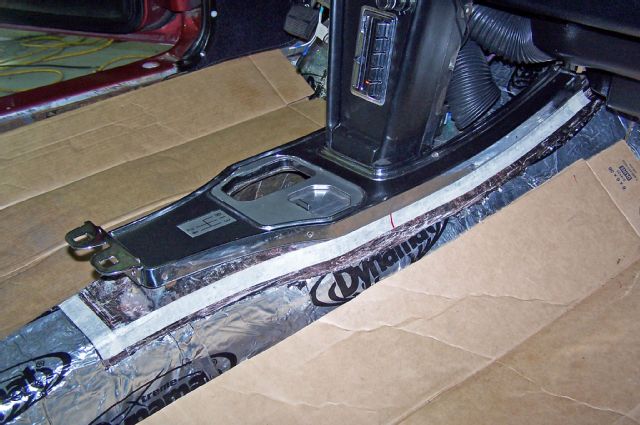
Now that we have made room for the new six-speed tranny on the chassis we must do the same for the transmission tunnel. To fit the new T-56 Magnum tranny in the car the transmission tunnel must be raised 1 inch. This involves cutting the original tunnel and spacing it up 1 inch. A roll of 1-inch masking tape was used to lay out the cuts. The kit includes riser tabs and rivets to position the tunnel top upward 1 inch. An additional hole is cut in the side of the transmission tunnel for driveshaft slip yoke clearance. All of this is clearly illustrated in the instructions.
With the tunnel held in place by the supplied riveted spacer plates it is time to test-fit the new T-56 Magnum in the car. There is no need to install the clutch or pressure plate at this point, simply bolt the bellhousing in place and slide the transmission into position and support the transmission/engine with a jack.
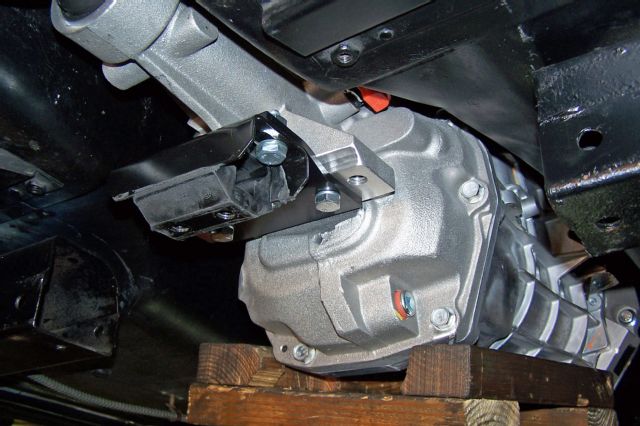
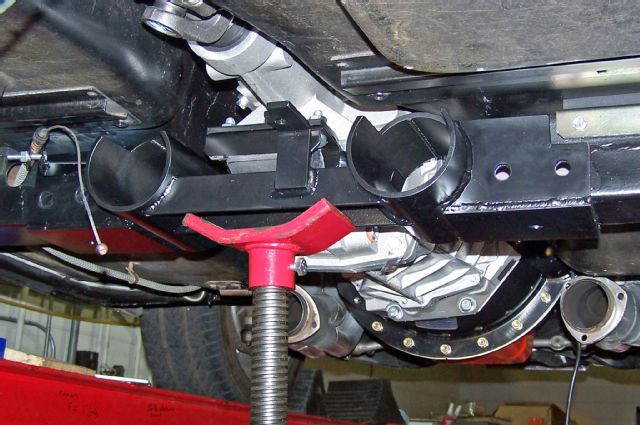
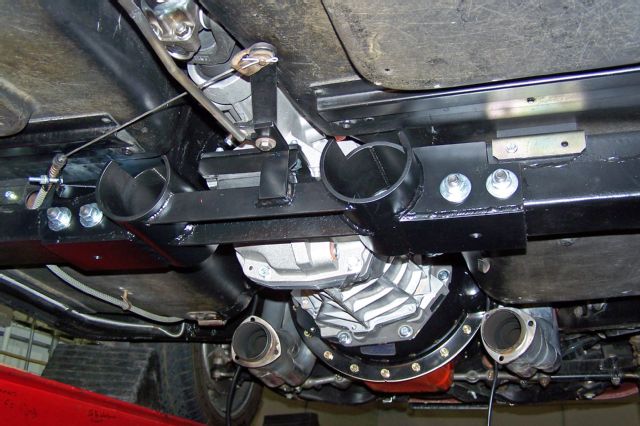
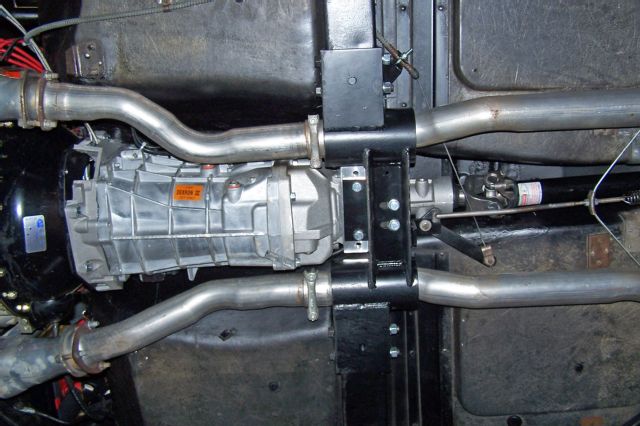
After installing the tranny mount insulator on the gearbox, the new crossmember is bolted to the mount and the new crossmember is lifted into place with a jack. Once you are certain the new crossmember is seated firmly around the existing frame four, 1/2-inch boltholes that mount the new crossmember, are drilled. You now have a very original appearing crossmember with the benefit of a removable center section. It really is a nice piece.
With the T-56 TREMEC tranny in place carefully check for clearance as you will need a minimum of 1/4 inch from every part of the tunnel. A trick way to check this is with a length of 1/4-inch hose, simply loop the hose over the transmission and move it forward and back the entire length of the tranny, being certain the hose moves freely. Once you are certain you have proper clearance drop the crossmember and remove the tranny, remembering to support the rear of the engine.
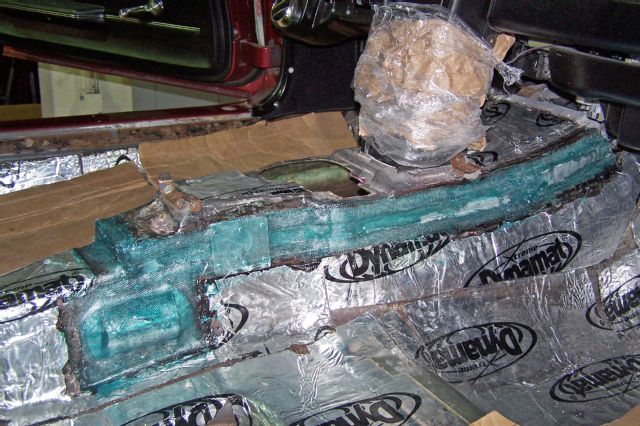
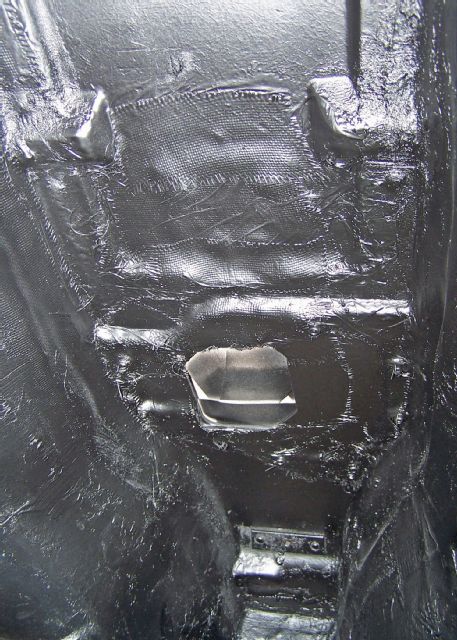
After thoroughly degreasing and sanding the fiberglass down to fresh material you can use basic fiberglass skills to fill the 1-inch gap with fiberglass cloth and resin. This process is done inside the car and under the car inside the tunnel. A couple of layers of cloth and resin restore the floor to original strength.
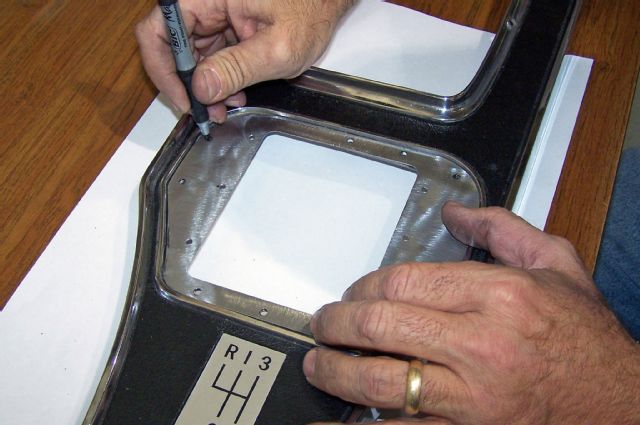
Special panels are included in the kit to provide clearance for the slip yoke and to fill the gaps on either end of the tunnel cut. Again, follow the directions, take your time and you will have a transmission tunnel that appears almost unaltered after the carpet is reinstalled. Clear instructions guide you through cutting the hole for the shifter.
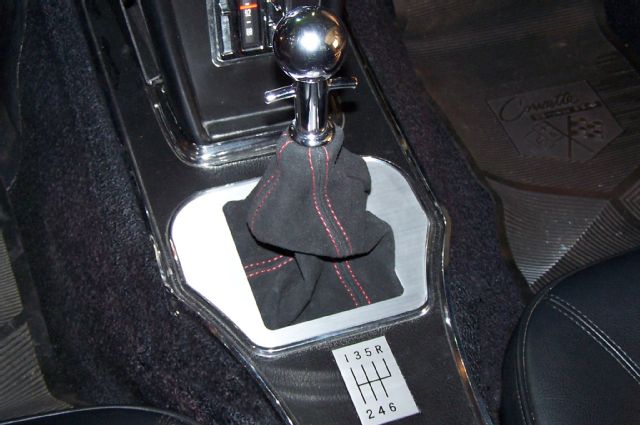
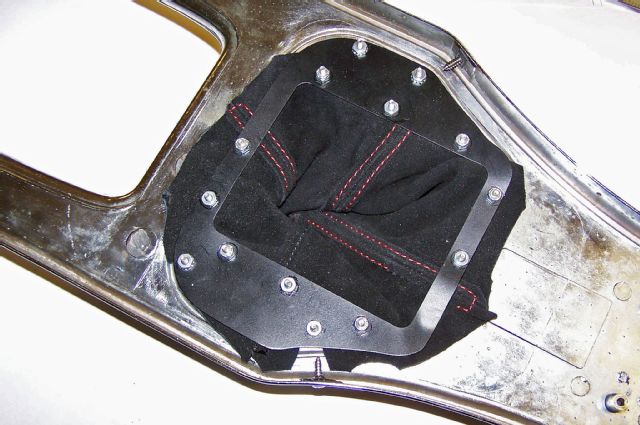
With the tunnel modifications complete the clutch, pressure plate and hydraulic throwout bearing can be installed. Up top, the original console plate for the shifter is modified and a very attractive suede boot fits the new opening. Every detail is covered with the Silver Sport PerfectFit kit from the parking brake to the speedometer cable. Install the slip joint in the rear of the transmission and fill the new TREMEC with proper fluid and check to be certain the transmission shifts smoothly through all gears before installing it in the car. Satisfied that the transmission shifts well, the T-56 is bolted in place for the last time. The driveshaft is connected to the slip yoke, the speedo cable connected and the parking brake cable is reinstalled to complete the conversion. Now for the fun part, hit the open road and enjoy mixing gears with a modern six-speed transmission that will make both the engine and the driver very happy for many years.
 2/31
2/3101. Kris Krishna enjoys driving his 427-powered 1966 Corvette regularly, but he soon realized with a 3.55 rear gear a modern T-56 TREMEC six-speed would certainly increase his driving pleasure.
 3/31
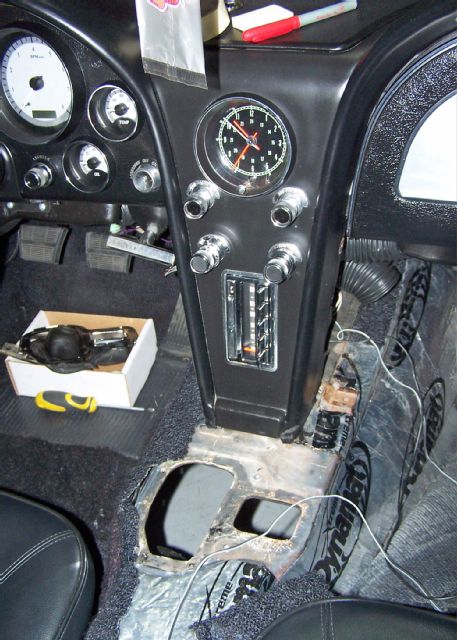
3/3102. While the Silver Sport Transmissions PerfectFit kit is designed for the enthusiast to be able to handle the installation, Kris opted to have Silver Sport handle the installation. The process begins by removing the original Muncie four-speed and clutch assembly from the car along with the tailpipes.
 4/31
4/3103. To fit a modern six-speed transmission in a C2 Corvette it requires a bit more room. The tunnel must be raised 1 inch to provide the proper clearance.
 5/31
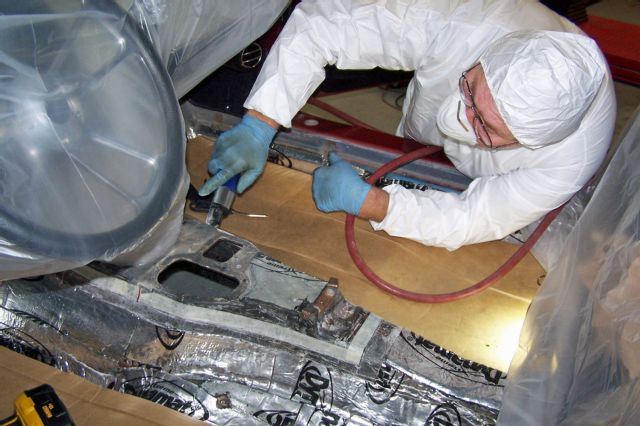
5/3104. Wearing proper protective gear, it was time to slice the transmission tunnel using a cutoff wheel. Prior to making any cuts, cover all interior pieces to protect them from dust.
 6/31
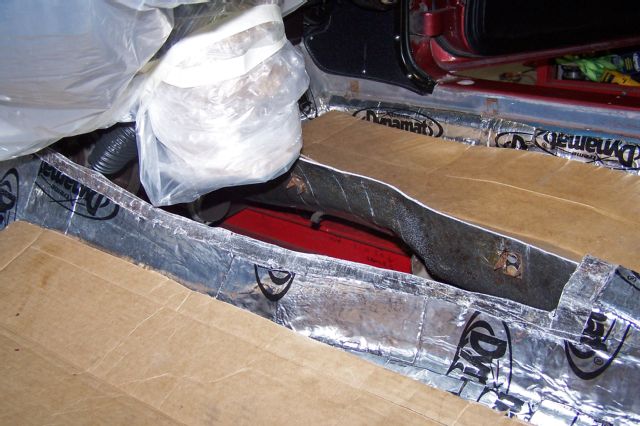
6/3105. By working carefully you should have a nice clean cut that looks like this. Note that the underside of the tunnel was completely degreased and cleaned prior to making the cut.
 7/31
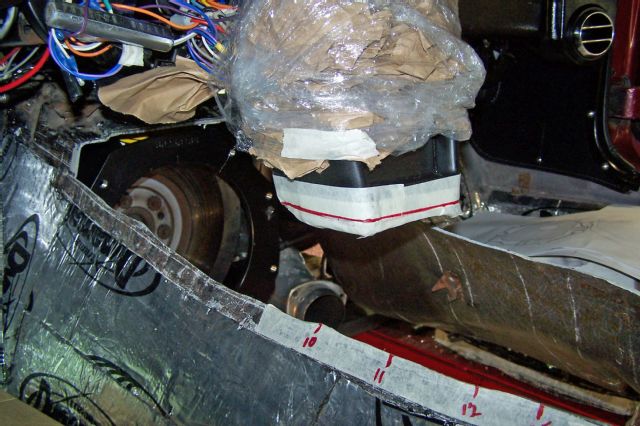
7/3106. The bottom of the center console must also be shortened. Once again, wrap everything carefully to protect surfaces from unwanted dirt or possible damage.
 8/31
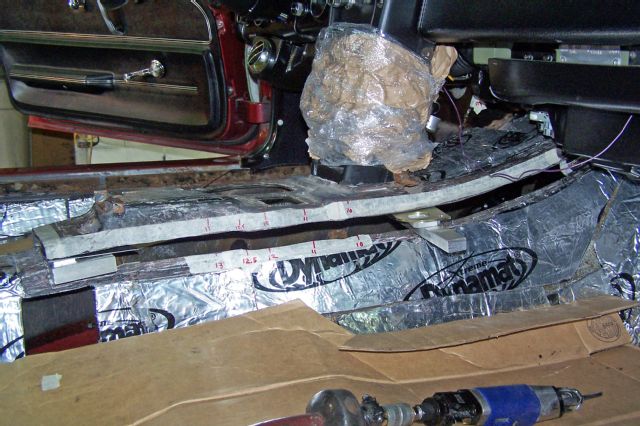
8/3107. After cutting the top of the tunnel free it will be raised 1 inch using spacers. Note the two pieces of tape have measurement marks on them so the raised piece is perfectly aligned with the lower tunnel.
 9/31
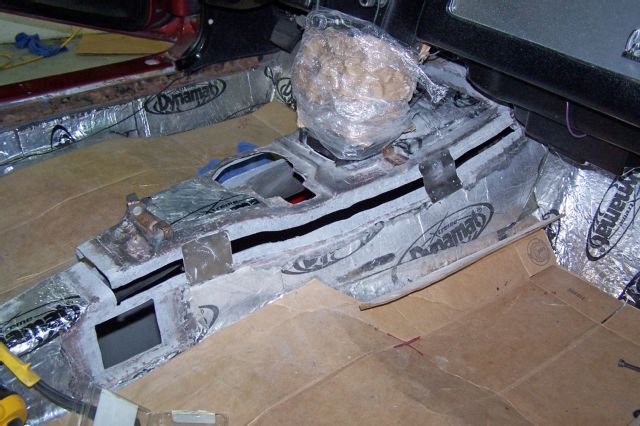
9/3108. Using the 1-inch spacers to lift the top panel, the supplied spacer plates are riveted in place. Note the hole in the side of the tunnel to provide slip yoke clearance. Special aluminum panels are provided for the ends of the tunnel and the yoke clearance.
 10/31
10/3109. The only modification to the chassis is cutting the center out of the original transmission crossmember. After carefully scribing the lines a Sawsall makes quick work of cutting the crossmember. Take special care not to damage the floor above the crossmember.
 11/31
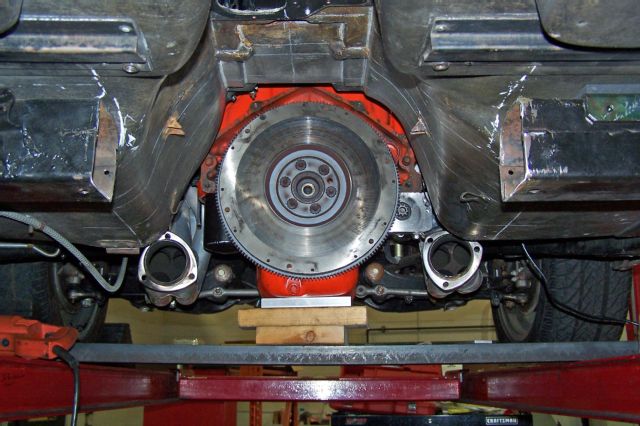
11/3110. With the center of the crossmember out of the way it is time to install the new, removable center section. Note the cut ends have been carefully deburred.
 12/31
12/3111. The transmission insulator mount is bolted to the tailshaft of the new transmission. The test-fit and crossmember work will be done without the clutch assembly on the flywheel.
 13/31
13/3112. The new tranny is bolted to the new bellhousing while the new center section is bolted to the tailshaft and raised into position. Slight upward pressure from the jack ensures the new crossmember is firmly seated against the chassis.
 14/31
14/3113. The four holes were marked with a transfer punch for the 1/2-inch bolts. The crossmember was removed, the holes drilled and then the crossmember was bolted in place.
 15/31
15/3114. After testing to be certain the transmission fits inside the modified tunnel it’s time to fiberglass the gaps and make the tunnel one again. Take your time and work slowly for good results as seen here.
 16/31
16/3115. The same fiberglass work was performed under the transmission tunnel. When the fiberglass work was complete a coat of semi-flat black provides a factory look to the modification.
 17/31
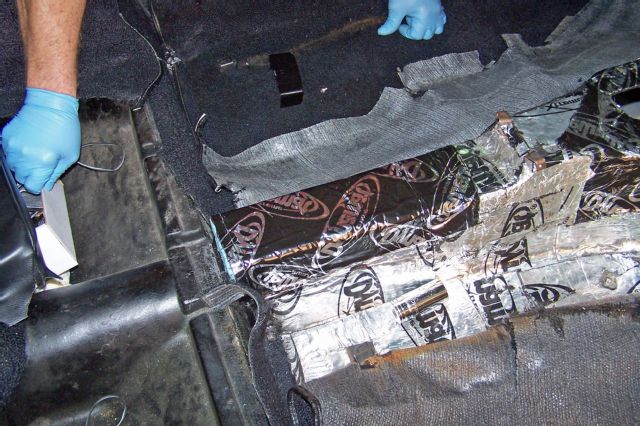
17/3116. After the fiberglass cured, Dynamat was installed over the tunnel to match the original Dynamat. This will go a long way to controlling noise and heat.
 18/31
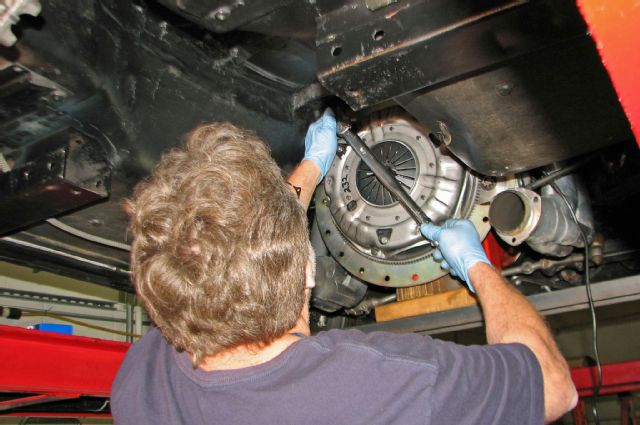
18/3117. Now it is time to install the new clutch and pressure plate. A drop of thread locker and the proper torque ensures the flywheel and pressure plate will remain securely fastened. Don’t forget to use a clutch alignment tool when installing the pressure plate.
 19/31
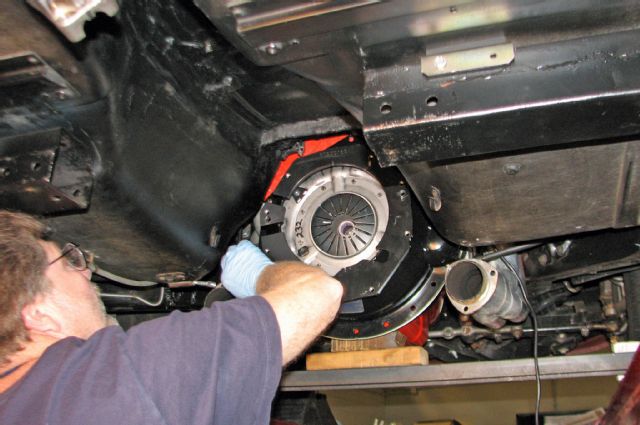
19/3118. The bellhousing is now installed as we are getting close to installing the Silver Sport T-56 TREMEC six-speed transmission for the last time.
 20/31
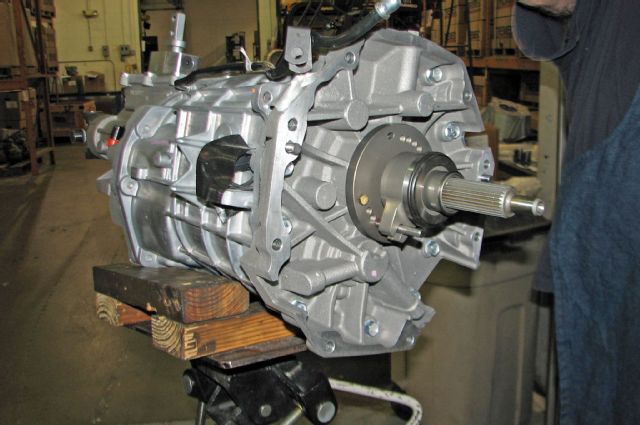
20/3119. After slipping the rear yoke in the transmission it is filled with fluid and using the shifter it is checked for smooth operation. Note the hydraulic throwout bearing is mounted on the input shaft.
 21/31
21/3120. The transmission is lifted into position and aligned through the clutch disc and into the pilot bearing in the flywheel. Work carefully to align everything and never use the transmission mounting bolts to “pull” the transmission in, it should slide in and mate with the bellhousing without using the bolts.
 22/31
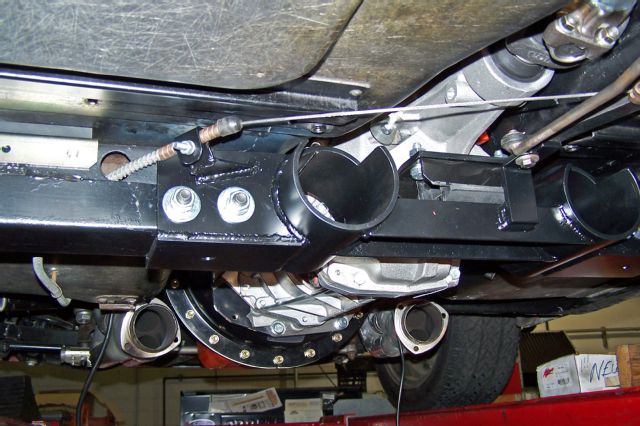
22/3121. With the transmission bolted to the engine the new crossmember center section is bolted in place for the last time. Note the new crossmember addresses both the parking brake and the speedometer cable brackets. This is a very well thought out kit.
 23/31
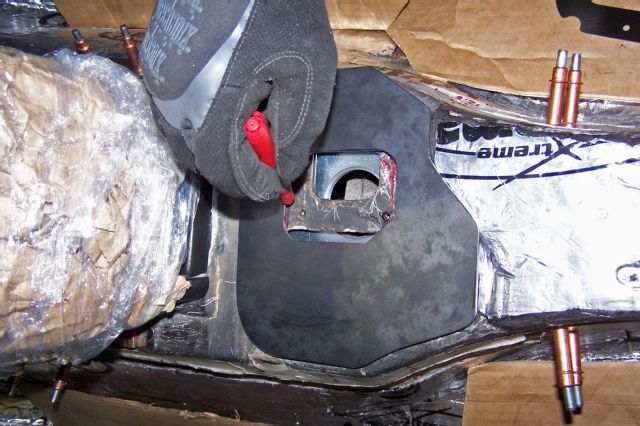
23/3122. Follow the detailed instructions to modify the top plate to provide shifter clearance for the new six-speed shift handle.
 24/31
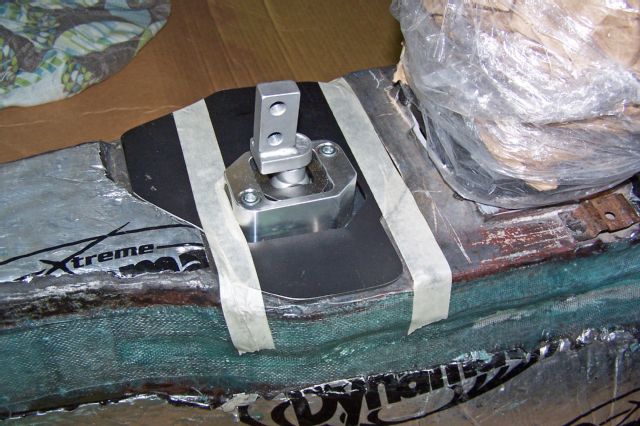
24/3123. With the shifter protruding through the tunnel the plate is held in place with tape while the appropriate holes are drilled in the top of the tunnel.
 25/31
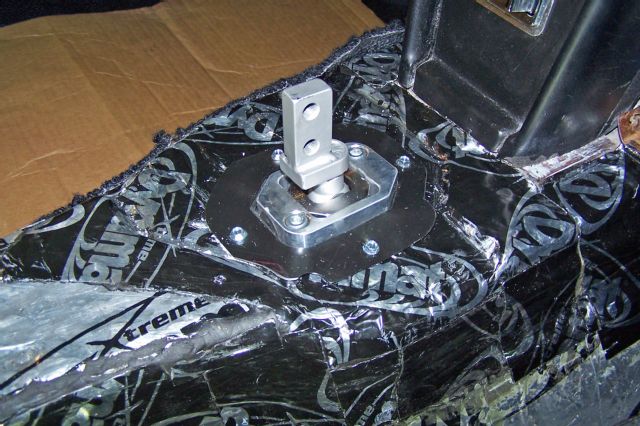
25/3124. Here we see the new plate screwed in place. This tight fit around the shifter will minimize heat from migrating into the passenger compartment.
 26/31
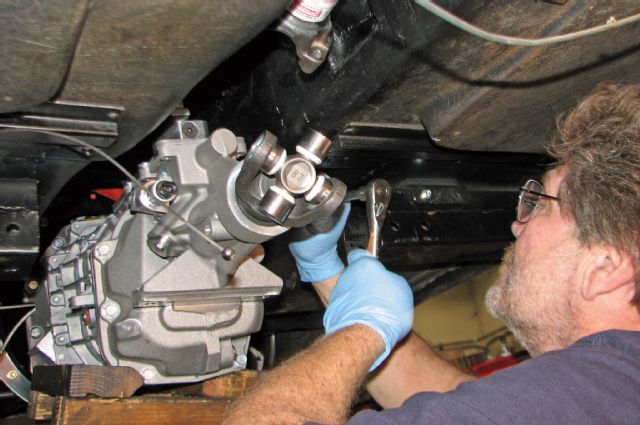
26/3125. Moving back under the car, the slip yoke driveshaft is connected and the exhaust installed again. Note the exhaust is routed through the new crossmember, exactly as the original design.
 27/31
27/3126. The original shifter opening must be modified and in the process you’ll lose the ashtray. Of course, that’s no big deal because you’ll be having so much fun shifting the last thing you need is a cigarette.
 28/31
28/3127. The new suede boot is held in place by this plate on the bottom side of the original trim piece. This ensures the boot will stay in place.
 29/31
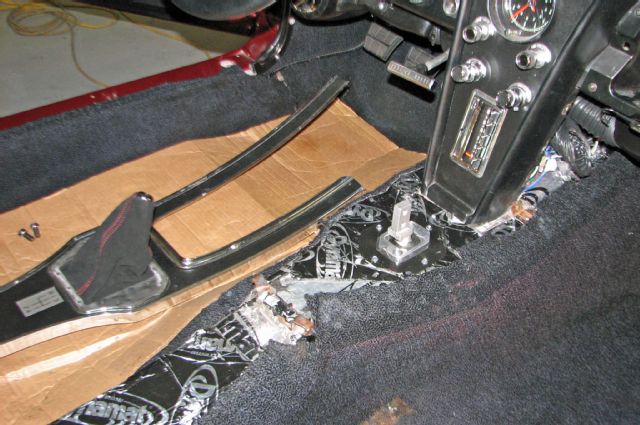
29/3128. Here’s the modified original trim piece with the suede boot installed ready for the final installation.
 30/31
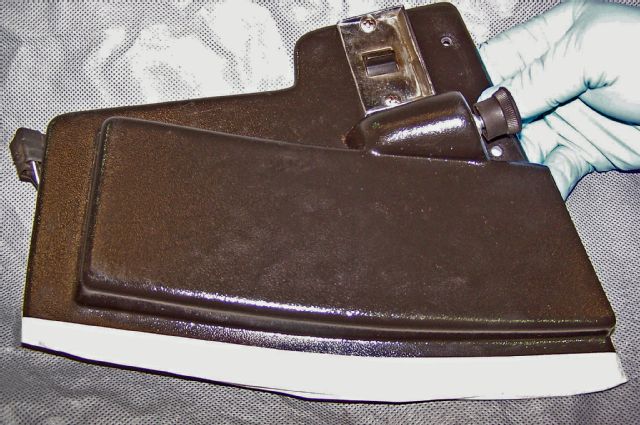
30/3129. Before the trim piece can be installed, the two side panels of the center console must be shortened 1 inch since the tunnel has been raised.
 31/31
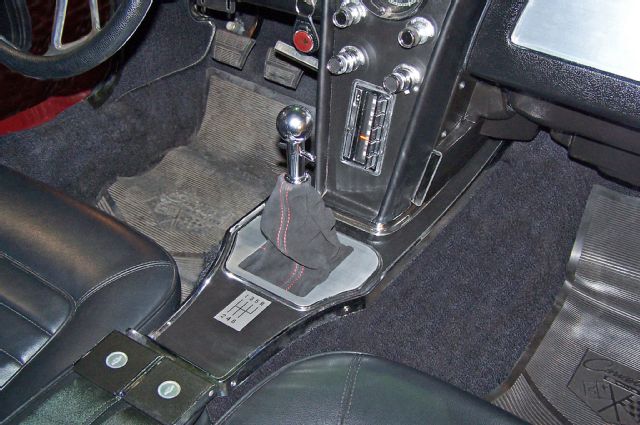
31/3130. With the side panels shortened and installed the modified trim piece is attached to the tunnel and our brand-new Silver Sport T-56 transmission looks to the whole world like a factory installation. The six-speed shift pattern plate is the final detail in the swap.
Powered by WPeMatico
